Take Profit Explained: TP1, TP2 and TP3 in a Trading Plan
Plan take-profit levels with clear reasons, calculate blended returns from partial exits and define what happens to exposure between TP1, TP2 and TP3.

Take profit describes a planned exit from a favorable price move. TP1, TP2 and TP3 are simply labels for successive objectives; they do not establish that price is likely to reach each one. A useful plan explains why the levels matter, how much exposure will be closed at each, and what happens if the market turns before the next objective.
The labels can make an analysis easier to read, but they can also hide weak reasoning. Three precise targets are not better than one defensible objective if the chart offers no evidence for the additional levels.
Begin with the available structure
Look for relevant opposing areas, prior swings and range boundaries. A target may be placed near a visible obstacle because the scenario anticipates difficulty progressing through it. Another method may use a measured move or a multiple of initial risk. These methods should be named rather than blended without explanation.
Distinguish a chart objective from an order price. A resistance zone can extend across several prices, while a limit order needs one price. The practical order may also account for the possibility that price approaches a widely watched area without trading through the exact level.
Review support and resistance when deciding which obstacles deserve attention. Do not choose a distant objective merely because it makes the reward calculation look attractive.
Decide whether partial exits fit the method
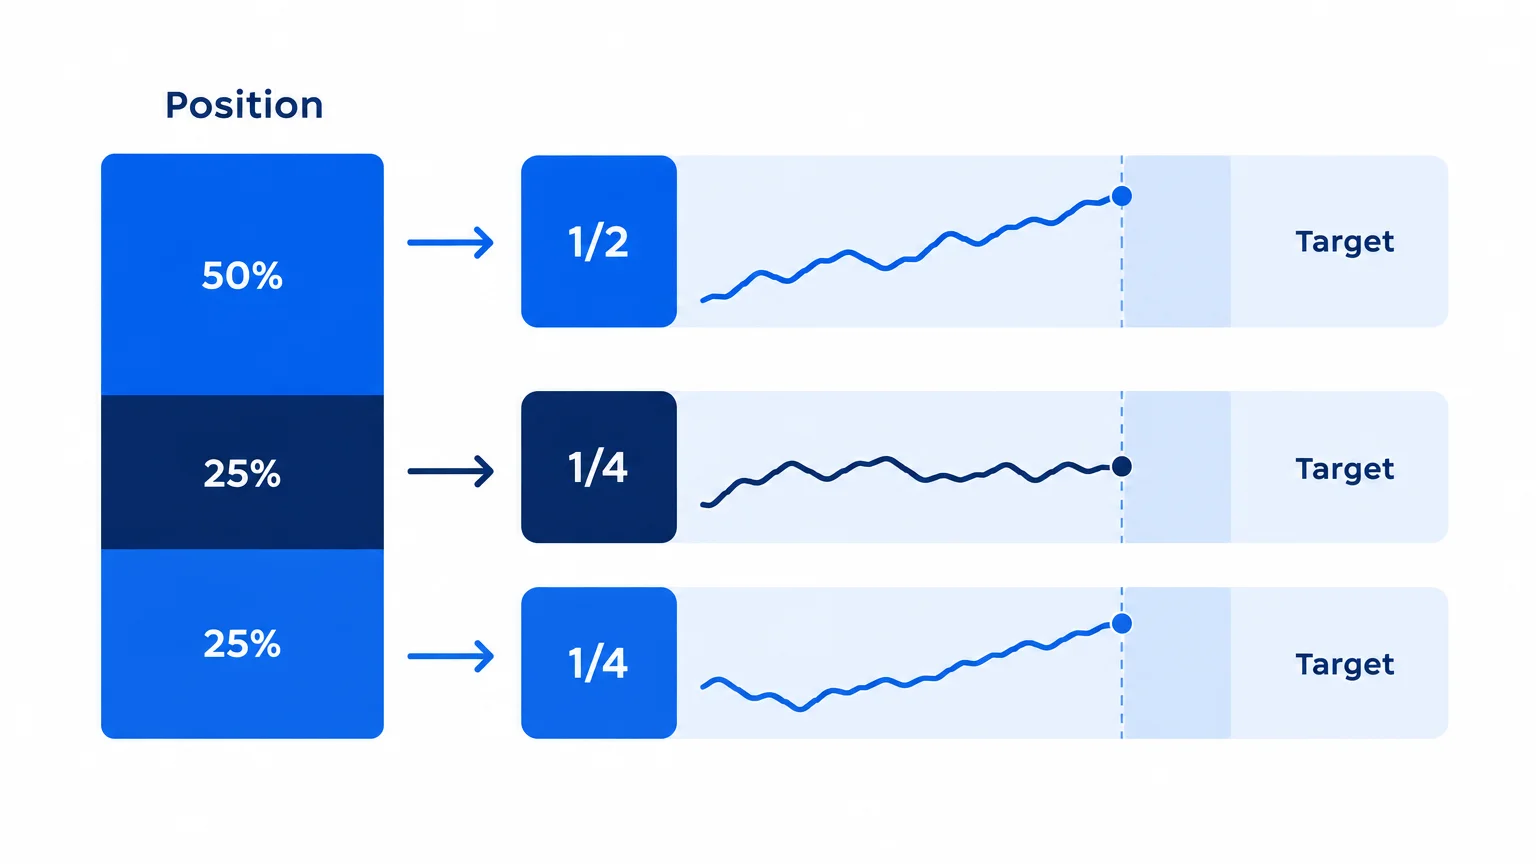
With staged exits, part of the position closes at TP1 and the remainder stays open for later objectives. This can reduce exposure and the emotional pressure of holding the full position. It also reduces the amount participating if the move continues strongly.
Neither effect proves the approach is superior. Compare it with a single-exit plan using the same entry, initial risk and realistic costs. A strategy should be evaluated over comparable examples, not selected because the last chart would have benefited from one particular exit pattern.
Specify the fractions before entry. If the position cannot be divided into those amounts because of minimum contract sizes, the written plan is not executable as stated.
Calculate the blended reward
Consider a hypothetical position with initial risk defined as one R. Half closes at 1R, one quarter at 2R and one quarter at 3R. If all three objectives fill, the gross contribution is 0.5 times 1, plus 0.25 times 2, plus 0.25 times 3: a total of 1.75R.
It is not a 3R outcome for the original full position. The highest target describes only the portion that remains exposed. Costs and differences in execution reduce the net result further.
The risk/reward guide explains the notation. Keeping the weighted calculation visible prevents a target ladder from overstating the opportunity.
Plan the path between targets
Suppose TP1 fills but the rest of the position later exits at the original stop. Using the example above, the first half contributes positive 0.5R and the remaining half contributes negative 0.5R, leaving zero before costs. That outcome differs from a plan that moves the remaining stop after TP1.
If you do move the stop, define the rule: to entry, beyond a newly formed swing, or according to another tested reference. Avoid assuming that a particular adjustment is automatically optimal. A tighter stop may reduce giveback while increasing the chance of exiting before a later objective.
Write down what happens after each partial fill, including whether outstanding orders must be adjusted. Platform order-management features differ; do not assume separate orders cancel or resize themselves unless you have verified that behavior.
Keep invalidation independent of wishful targets
The trade's invalidation should follow the scenario, not the desired reward multiple. Moving the stop closer simply to advertise a better ratio can create a plan that does not tolerate ordinary movement. Moving the target farther away can make the arithmetic prettier without making the target more plausible.
Read stop loss explained before combining the two sides of the plan. Entry, invalidation and objectives must describe the same timeframe and scenario.
If the nearest meaningful target offers too little room, passing on the trade is a valid result. You do not need to manufacture TP2 and TP3 to justify taking it.
A range-trading example without live prices
Imagine an illustrative entry near the lower boundary of a range after a defined rejection. The midpoint may be an area to reassess, while the upper boundary is a more ambitious objective. Whether the midpoint deserves a partial exit depends on the method and available distance after costs.
Now suppose price reaches the midpoint slowly and begins to overlap. The plan should state whether that behavior changes anything. If it does not, avoid inventing a new rule solely because the open profit feels vulnerable. If it does, record the condition so the same logic can be applied to future examples.
This framework is educational. It does not identify a current range or imply that the next rotation will reach its opposite side.
Account for order and event risk
A displayed target price does not ensure an order will fill. The market may touch a quoted level without providing the necessary execution for your order, depending on venue and order priority. A fast move can also create different outcomes from those suggested by a static chart.
Scheduled events deserve a separate policy. Decide whether objectives remain valid through the event, whether exposure will be reduced, or whether the trade will be closed before it. These choices involve trade-offs and should not be disguised as certain ways to avoid loss.
For products with funding, financing or substantial spread costs, a longer wait for TP3 can change the economics. Evaluate the expected holding period as part of the target plan.
Review exits using more than the final chart
Record which objectives were actually available after entry, which filled, and what happened to the remaining position. Avoid judging an exit solely by the most favorable price reached later. At the time of exit, the future path was unknown.
Separate three questions: did the market provide the planned opportunity, did execution match the plan, and was the plan economically sensible over comparable cases? This makes improvements more specific than simply resolving to “hold winners longer.”
Keep the target plan readable
A compact exit table can prevent confusion. For each objective, record the analytical reason, fraction to close, order instruction and rule for the remaining position. Include a final row for the failure condition. If the table requires decisions that cannot be made with the available information, resolve them before entry.
This also improves review. You can compare intended fractions with actual fills instead of describing the trade vaguely as having reached TP2. The label alone does not reveal how much exposure remained, whether the first exit filled or what happened afterward.
Key takeaways
- TP labels need a method and an observable reason.
- Partial exits reduce both exposure and participation in later movement.
- Calculate the weighted outcome for the original position.
- Define stop and order adjustments before the first target fills.
- Reject setups whose targets require unrealistic assumptions.
Frequently asked questions
Must every trade have three targets?
No. One objective, a trailing exit or another defined method may be more appropriate. The number of labels should follow the strategy and visible opportunity rather than a fixed output template.
Is TP1 always the safest target?
It is usually the nearest labeled objective, but proximity does not establish the probability of execution. The market can reverse before reaching it, and costs may consume a meaningful part of a small move.
What does 3R at TP3 mean?
It means the target distance equals three times the initial risk distance under the stated calculation. If only part of the position remains, the total position's realized result will not equal 3R simply because TP3 fills.
Should I move the stop after taking partial profit?
Only according to a defined plan. Compare the consequences of different rules using consistent examples. Moving the stop changes the distribution of possible outcomes; it does not remove uncertainty.
Can AI-generated targets be used directly?
Treat them as proposals to inspect. Verify the levels, method, timeframe, intervening obstacles and weighted reward. Reject targets that rely on unreadable chart prices or unsupported confidence claims.
Conclusion
Take-profit planning is the design of a complete exit process, not a list of attractive numbers. Connect each objective to the chart, specify the fraction and follow-up rule, and calculate the blended result. Clear exit logic makes both live decisions and later reviews more honest.
Prepared with AI assistance
Keep exploring
 Risk Management
Stop Loss Explained: Define Risk Before Entering a Trade
Understand stop-loss planning, stop and stop-limit orders, execution uncertainty and the link between a defensible exit distance a...
Read article Risk Management
Risk/Reward Ratio in Trading: Calculate It and Use It
Calculate trading risk/reward using real entry assumptions, understand R multiples and break-even arithmetic, and account for cost...
Read article Risk Management
What Is an Invalidation Level in Trading?
Define a trading setup's failure condition, distinguish invalidation from stop execution and use price, time and event rules witho...
Read article